
Tankers!!
Many colleagues asked me how I make my decals at home. Well, here's a little tutorial on how to do it. I use a color laser printer. In the case of inkjet, I don't have much experience, but I think it's just a matter of varnishing the decals before they are applied ... But, really, I can't say for sure. But with laser, this method works !!!
The first thing is to use a computer software that allows vector drawings. I use (or rather try to use ...) the Corel Draw 18. Other possibiliti is the Inkscape (https://inkscape.org/release/inkscape-0.92.3/) The bestof the Inkscape is the software is free!!!
The first thing to do is to mark the desired actual sizes. I love the metric system ... After measuring the spaces for the markings in the kit, I transfer these measurements in millimeters to my drawings.
The big problem is that I can't print the white color, because I use a regular color laser. Drawings with solid color areas are no problem, as we can make areas the same size as white decal markings as a contrasting background. If we applied the decal printed with the markings directly on the kit, the thing would be "off", because the laser (and ink) print is not so "solid" ... the print is almost transparent on lasers and inkjets. Silkscreen solves this translucency problem, but then the technology is much more complicated ....
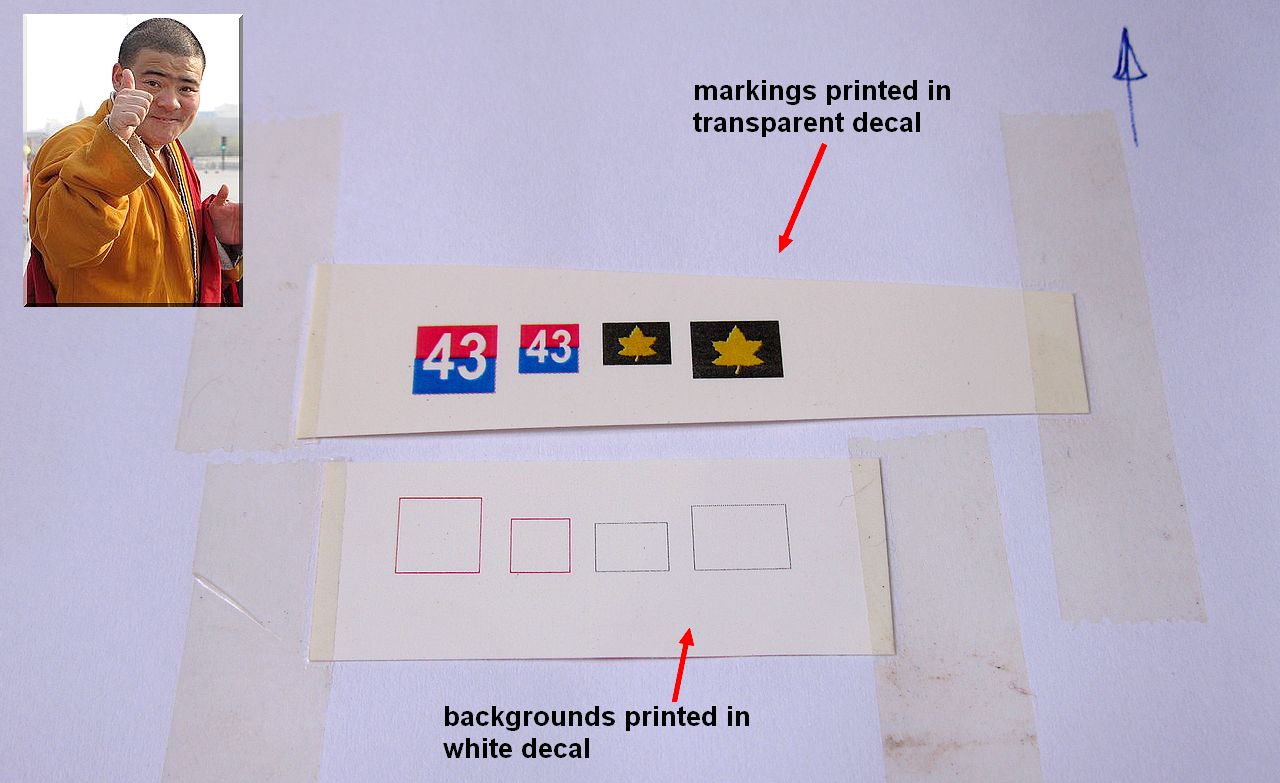
But back to the equipment we have at home ... You draw the markings that will be printed in transparent decal and the backgrounds (only the contours) on white decal.
And you ask: Why not print everything in white decal? Simple ... The clipping is very complicated and where the scissors or scalp cut, the color is torn out. The decals have horrible white borders !!!
If you make a background with tenths of a millimeter smaller and on that background you apply a colorful decal with defined printed borders, it gets much more professional. But let's see the images ... They speak to us in a thousand languages !!!
This pics are from this article, here, in Bunker: Kangaroo defrocked Priest;
http://panzerserra.blogspot.com/search/label/Kangaroo%20APC%20%20%22Defrocked%20Priest%22
This pics are from this article, here, in Bunker: Kangaroo defrocked Priest;
http://panzerserra.blogspot.com/search/label/Kangaroo%20APC%20%20%22Defrocked%20Priest%22
 |
| Print screen of my Corel Draw project. Above, the markings that will be print in transparent decal below, the areas that will be printed in a piece of white decal These countours are tenths of a millimeter smaller than markings |
After the work is done, I print a test sheet on A4 paper.
 |
The test-print.You test the measurements and the colors...
If everything being ok, the next step is to cut pieces of decal sheets. |
 |
Use small pieces to avoid waste. Do not print on the entire sheet,
as the heat of printing
would ruin the decal after 2 or 3 prints in a row ... |
 |
| Apply the decal pieces with tape so that the decals completely "cover" the test print. You will return the paper to the same position on your printer and when you command a new print, it will be over the decals. Simple!!! |
 |
| Perfectly executed printing... The monk approves!! |
 |
| The decals after being cut and positioned for comparison purposes. |
Now, things are a little different: the transparent decal with markings you can cut with a small border, which will be invisible after sealing the decal with gloss varnish or Pledge. But the background should be cut EXACTLY in the contours, no more and no less ... If the cut is not precise, this would ruin the aesthetics of the markings.
 |
| Markings with borders and backgrouds cutted with precision. |
 |
| Decal time: water!!! |
 |
| First step: backgrounds decals in white... rear view. |
 |
| Front view of backgrounds. Wait few minutes to dries. |
 |
| Time of markings... |
 |
| The markings (transparent decals) over the white background... Perfect!! |
 |
| In the rear of the Kangaroo... |
After the decals dry, seal the entire work with a thin layer of gloss varnish or Future / Pledge. Wait for it to dry and start the weathering process, at your discretion ...
Good luck and any doubts, write to me !!